Before You Heat Press: Tips for Perfectly Sized & Positioned Transfers
In the realm of Direct-to-Film (DTF) transfers, achieving a professional and visually appealing final product hinges on two critical factors: precise design placement and appropriate sizing. Whether you're customizing t-shirts, caps, onesies, or tote bags, understanding the optimal positioning and dimensions of your designs is essential. For DTF business owners, this attention to detail ensures brand consistency and elevates customer satisfaction. Enthusiasts and hobbyists will find that mastering these elements significantly enhances the quality of their creations.
This comprehensive guide explores key considerations and techniques for effective heat press design placement and sizing across various apparel items. Whether you're a seasoned professional or embarking on your DTF journey, these insights will equip you with the knowledge to consistently produce outstanding results.
Importance of Accurate Design Placement
The importance of accurate design placement cannot be overstated. Misaligned or poorly positioned transfers can create an amateurish look, which can negatively impact a business's reputation and perceived professionalism. On the other hand, precisely placed designs convey attention to detail and a commitment to quality, elevating the overall perception of the brand. For personal projects, proper placement ensures that the design looks intentional and visually appealing, making the t-shirt more enjoyable to wear and showcase.
Popular Heat Transfer Design Placement for T-Shirts
The first step is understanding the various placement options available for your DTF designs. Here's a breakdown of some popular choices:
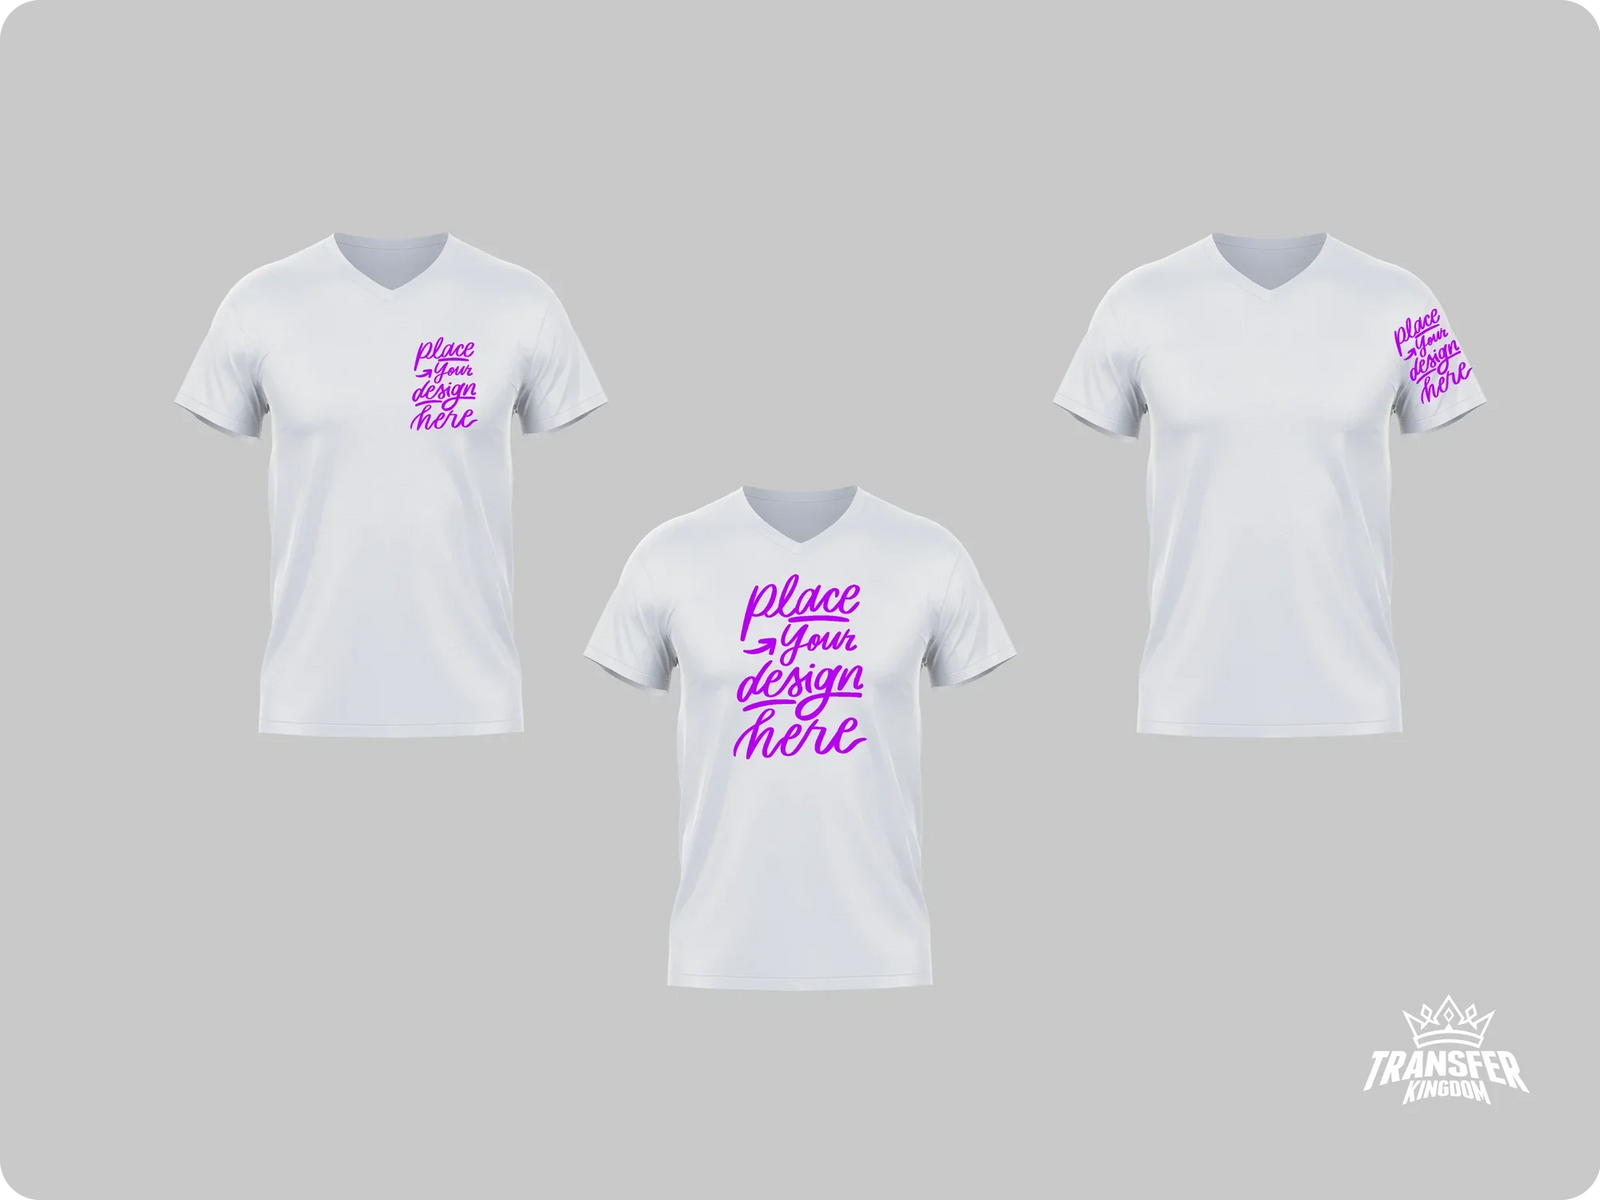
Sleeve Placement & Sizing

Sleeve placements add a unique touch to t-shirts. You can choose short-sleeve or long-sleeve placements, typically positioned 1-2 inches below the shoulder seam and centered on the sleeve. This placement works well for smaller designs, logos, or badges. Transfer size for sleeve placement can be around 3-4 inches in length or width.
Back Placement & Sizing

Back placements offer a great canvas for statement designs or graphics that benefit from a more prominent display. You can choose a high back placement (closer to the collar) or a low back placement (closer to the waist) depending on the design and desired effect. Typical transfer size for back placement can be anywhere from 10-13 inches in length or width.
Left/Right Chest Placement & Sizing

This placement is commonly used for logos or branding elements. It's ideal for polo shirts where the button placket might interfere with a centered design. On regular t-shirts, the left chest placement offers a subtle, brand-conscious aesthetic. The typical position is 7-9 inches down from the left shoulder seam and 3-5 inches in from the center. The ideal size for chest placement DTF transfers is 3-4 inches in height or width.
Center Chest Placement & Sizing

This is the classic and most versatile option. It works well for a wide range of designs, logos, and text-based graphics. The standard placement is typically 3-4 inches below the collar seam, centered between the left and right seams. For kid's sizes, you might need to adjust slightly higher to avoid placing the design too low. The ideal size for centered chest placement can vary based on shirt size (toddler, youth, adult-sized). The range of DTF transfers for this category is from 5-10 inches in height or width.
Full Front Placement & Sizing

This option allows you to showcase larger designs or create a bold statement piece. Full-front placement offers maximum design real estate, ideal for intricate artwork or photographic prints. Keep in mind that larger designs might require a heat press with a larger platen size. The typical transfer size for this placement is around 11-13 inches in length or width.
Baseball Cap Sizing

Front Placement: Designs are usually 3 to 4 inches in width or height and centered on the front panel.
Side Placement: Smaller designs, about 1 to 2 inches in width or height, positioned on the side panels.
Baby Onesie Sizing

Front Placement: For infants' onesies, designs are typically 3 to 5 inches wide, centered on the chest area.
Back Placement: Smaller designs, around 2 to 3 inches wide, can be placed on the upper back.
Tote Bag Sizing

Front/Back Placement: Designs generally measure 7" to 9" wide, centered on the bag's panel, leaving a border for a balanced look.
Choosing the Right Placement:
While these are some popular options, the ideal placement for your design depends on several factors:
-
T-Shirt Size and Style: Design placement might need slight adjustments across different sizes (S, M, L, XL) to maintain a balanced look. For example, a centered design on a small size might appear too high, while the same placement on an XL size might look low. Similarly, v-neck and crewneck styles might require slight vertical adjustments to ensure the design sits aesthetically within the neckline.
If you are looking to get started, Transfer kingdom offers a variety of blank apparel to choose from!
Design Size and Shape: For large designs, consider centering them on the t-shirt to achieve a balanced look. For smaller designs, you might have more flexibility in placement. Additionally, consider the orientation of your design – portrait or landscape. A portrait design might look best centered on the chest, while a landscape design might benefit from a lower placement on the back.
Target Audience and Design Style: Think about your target audience and the overall style of your design. For a younger audience, a slightly higher placement on the chest might be more visually appealing. For a more formal design, a centered placement often creates a more professional look.
Techniques for Precise Heat Press Design Placement
Now that you understand the different placement options and factors to consider, let's explore some techniques for achieving precise positioning:
The "3 Finger Rule" (Quick and Easy for Full-Front Placement): This is a popular method for quickly estimating the ideal placement for full-front designs on adult-sized t-shirts. Simply use your hand as a measuring tool. Place three fingers (or four fingers for smaller hands) down from the collar seam. The top of your design should roughly align with the bottom of your fourth finger. While not a foolproof method for all sizes and designs, it's a handy starting point for full-front placements.
Using Shirt Seams for Centering: Identify the vertical center of the shirt by drawing an imaginary line down the center from the collar seam. Next, find the armpit seams under the sleeves. Draw an imaginary line horizontally across the chest of the shirt. The point where these two imaginary lines intersect is the center point of the t-shirt. This method helps you center your design both horizontally and vertically.
Rulers and Templates: For more complex designs or situations where consistent placement across multiple shirts is crucial, rulers and templates come in handy. You can create your own templates using transparent film or purchase pre-made alignment guides specifically designed for t-shirt transfers. These tools ensure precise and consistent placement every time.
Heat Transfer Alignment Tools: Several specialized heat transfer alignment tools are available in the market. These tools often feature grids, rulers, or laser pointers to help you accurately position your transfer on the t-shirt.
Additional Tips and Considerations
Mockup Tools: Before committing your design to a t-shirt, consider using mockup tools offered by design software or online platforms. These tools allow you to visualize how your design will look on different t-shirt sizes and styles with various placements. This can be a valuable aid in finalizing your placement strategy.
Test Pressing on Scrap Fabric: It's always a good practice to perform a test press on a scrap fabric similar to the t-shirt material you'll be using. This allows you to ensure your design transfers properly and to fine-tune your heat press settings. Additionally, you can test your placement on the scrap fabric to confirm it looks visually appealing before pressing on the final t-shirt.
Heat Press Platen Size: Keep the size of your heat press platen in mind when choosing a design placement for larger transfers. If your design is larger than the platen, you might need to adjust the placement or consider using a heat press with a bigger platen size.
Conclusion
Mastering heat press design placement takes practice and an understanding of the factors at play. By following the tips and techniques outlined above, you'll be well on your way to achieving professional-looking results with your DTF transfers. Remember to experiment with different placements, utilize mockup tools, and always test press on scrap fabric before finalizing your design.
If you would like to get started today, we offer options to upload your design or even order from our own premade designs!